The Best Pecan Pie – made with kithul

The Best Pecan Pie my family has ever had made with kithul, a sugar free, low glycemic treacle that tastes like caramel!

A couple of years ago when we learned that my father was diabetic, I started to make this Agave pecan pie recipe as a sugar free option. It was a good recipe, but we started to move away from using agave. Coconut syrup became the new favourite, and then my father discovered kithul as a delicious low glycemic option. I used the kithul to make our holiday pecan pie and wow! This has since become our family’s number one favourite dessert!

Agave Pecan Pie Recipe Review

So what exactly is kithul? Kithul is type of treacle that comes from Sri Lanka. Also called jaggery, you might think of it as something like maple syrup but with a caramel flavour that’s absolutely delicious but unlike maple syrup, it’s low glycemic and diabetic friendly.

The kithul is amazingly delicious and perfect for pecan pie. Here’s my blue ribbon pecan pie recipe.

RECIPE: PECAN PIE 

1 9″ pie

Ingredients: 

2 cups kithul
3 large eggs
1/3 cup butter, at room temperature –
2 cups pecans, half broken, half whole
1 teaspoon vanilla extract or
¼ teaspoon salt

Also:
1 uncooked pie crust of your choice
tinfoil to make a pie guard for your crust, or similar

Directions:

1.  Preheat oven to 350 degrees.

2.  In a dry skillet, roast pecans over medium heat for 5 minutes.  Set aside.

3.  Cook the kithul in a pan and gently boil for 10 minutes to reduce it to a thicker syrup.  Remove from heat and let it cool down a little bit for about 2 minutes.

4.  Beat eggs lightly and gradually pour into the heated kithul, beating constantly to prevent eggs from scrambling.

5.  Cut the butter into little chunks and add to the mixture while you are beating the eggs and kithul.  Stir in the vanilla extract and salt.

6.  Add roasted pecans to the uncooked pie crust.  Pour mixture over top.

7.  Carefully place your pie in the oven and bake about 30 minutes, then remove, place pie crust shield on it, and return to the oven for another 30 minutes (a total of 1 hour in the oven).

8.  You can test the pie by sticking a knife in the middle.  If the knife comes out clean, the pie is done.  It if comes out dirty, it needs about 10 more minutes in the oven.

9.  Cool pie on a wire rack.

Agave Pecan Pie Recipe Review

Obsessed with Raw Summer Soups

I haven’t blogged for a while, mainly because I’ve been very busy but also because my habits, values and interests have steered me away from desserts. I’ve been enjoying a lot of wonderful salads and my usual green smoothies. However, I’ve got a new culinary interest and it’s about time I started to record my creations.

Raw Soups have been rocking my world lately. It all started with Raw Gazpacho, but this week I’ve been experimenting with wonderful results. I love my Vitamix!

This year, I’ve also started some gardening for the first time. I’ve been growing loads of beautiful kale, 3 kinds of tomatoes, lots of fragrant basil and cilantro. It’s so great to pick these and add them straight in to my soup.

Raw Gazpacho

  • Tomatoes, about 3 medium sized
  • Zucchini, one or two small ones.
  • Celery, 1 or 2 stalks
  • Loads of fresh basil
  • 2 or 3 cloves of garlic
  • Raw Saurkraut, a third of a cup
  • Red Onion, or green onion depending
  • Avocado, optional but creamy and delicious
  • A drizzle of Rallis ice pressed olive oil (my favourite)
  • Sea salt sprinkled on top

Yesterday I made a similar soup but with cilantro instead of basil and I added some fresh ginger and a little coconut. Very yummy.

Raw Ginger Beet Soup

  • 1/2 BeetIMG_00000179
  • 1 Carrot
  • 1 Celery Stalk
  • .33 coconut milk (I just used light canned coconut milk which isn’t actually raw but I don’t feel like cracking a coconut)
  • small piece of ginger
  • drizzle Honey Ginger infused White Balsamic (optional)
  • sprigs of cilantro for garnish (optional)
  • avocado cubes to swim in the soup (optional)
  • sea salt (optional)

IMG_00000186Raw Corn & Pepper Soup

  • fresh kernels from 2 ears of corn
  • 2 small orange peppers
  • 6 yellow tomatoes
  • 2 tbsp red onion
  • 1 ripe peach
  • 1 small piece of ginger
  • 1/4 tsp organic miso
  • touch of white balsamic vinegar (optional)
  • touch of hot sauce


This version of the soup includes coconut milk, a zucchini and some hot pepper.

This version of the Corn & Pepper soup includes coconut milk, a zucchini and some hot pepper.

Example of a Raw Summer Vegetable Soup

  • 1 Medium Tomato
  • 1 Medium Zucchini
  • Aprox. 1 cup of the red stalks from Swiss Chard
  • 1/2 Medium Beet
  • 1 Small Carrot
  • 1 Celery Stalk
  • 1 Clove of Garlic
  • Aprox. 1/4 cup of Red Onion
  • 1/2 small Avocado
  • Bunch of Basil
  • Drizzle of infused White Balsamic (something else sour would do the trick)
  • A drizzle of Rallis ice pressed olive oil (my favourite)
  • Sea Salt sprinkled on top

The 2014 Totally Fabulous Vegan Bake-Off: Pucker Up Lemon Squares (raw)

lemon squaresYesterday I participated in Toronto’s Totally Fabulous Vegan Bake-Off! I entered in the raw category with an updated version of my original raw lemon squares. It was a really neat experience! I was there rather too early, the first non-professional on-site in fact. I’m both a busy bee but also an eager beaver, what can I say.

I’m hoping to post some photos later of the raw plate which included my lemon squares and the other items that I was up against. Here are the listings from my category:

Decadent Raw Desserts (Gluten-Free friendly, check ingredients carefully)

Title Description  
Pucker Up Raw Lemon Squares Tart, lip puckering, rich and creamy lemon perfection, all rolled into one delicious raw gluten free treat!
Raw Chocolate Lavender Cheesecake Rich and creamy chocolate cheesecake with a hint of local lavender – served on a chocolate brownie crust.
Raw Gluten Free Raw Sticky Zucchini Flax Cinnamon Buns, rolled in raw Carmel sauce and drizzled with raw cashew cream!!
Better Tarts A raw take on a canadian classic, that is better for you and better tasting!
Molten caramel brownie Fudge brownie, gooey caramel centre, sprinkle of sea salt…yum.

The plate was pretty monochromatic, as were a few of the plates in other categories, so my lemon squares really popped! I used extra tumeric for more colour this time around, and I also added a lemon drizzle (coconut butter, lemon, stevia) to use as “glue” to stick on some sour lemon flakes made with dehydrated lemon for some extra texture. I was thrilled with how they came out, and all of the feedback I received was very positive. Maybe too positive, since it made me overly hopeful that I might win in my category which I didn’t, but that’s ok. It was still a nice day.

Old Recipe: Original Raw Lemon Squares

New Recipe: Totally Fabulous Raw Lemon Squares

Filling:

  • 5 cups of dried, unsweetened coconut.  butter (approximately one jar or about 4.5 cups of fine dehydrated coconut converted in to coconut butter)
  • 2-4 tbsp of coconut oil
  • 10 lemons, zested first, then squeezed
  • 1/3 cup of lucuma powder (optional)
  • Stevia Powder to taste – I like NOW brand
  • 1/4 tsp tumeric (for colour, optional)
Crust:
  • 1 cup of raw cashews
  • 1 cup of raw coconut flour
  • aprox. .5 cup of dates (use more as needed)

IMPORTANT INSTRUCTIONS: **Your food processor must be completely dry for this to work, and all ingredients should be at room temperature before proceeding.

  1. Blitz the dried coconut and 2 tbsp of coconut oil in the food processor to make coconut butter. This can take several minutes. Stop and scrape the sides of the sides of the food processor often. If after 5 minutes your mixture is still dry, add more coconut oil as needed.
  2. Once you’ve made a completely smooth butter, add the lemon zest. Blend.
  3. Add the lucuma. Blend.
  4. Add the lemon juice. Blend.
  5. The stevia that I use comes with a tiny little spoon inside the jar. Add 2 of the tiny spoonfuls, or just a small pinch of stevia and blend and taste often. Adding only a small amount at a time, add more of the stevia as needed adjusting to your palette.
  6. Add the tumeric. Blend.
  7. Pour contents in to a bowl and set aside on the counter (not the fridge) while you continue on to make your crust. 
  8. When working in this order, there is no need to clean the food processor. Blitz cashews in the food processor until they start to form a crumb. 
  9. Add the coconut flour and approximately 6 dates and start the food processor going, adding more dates until the mixture starts to seem slightly sticky. Stop the food processor and smoosh some of the mixture together with your fingers from time to time and when the mixture starts to stick together, it’s ready.
  10. Line a pan with parchment paper, or oil and dust with coconut flour before pressing the crust in to the form.
  11. Once you’ve pressed the crust in to a pan, scoop the filling in to the pan and smooth it out with a spatula. Place it in the freezer for at least one hour before cutting and serving. I like to make this the night before and thaw it out the next day for serving.

The Raw Chocolate Lavender Cheesecake that won was really lovely. It was both aesthetically nice, and very tasty. For me, chocolate does tend to be chocolate and can get repetitive, but the addition of the lavender added some interest and the texture in particular of the creamy chocolate in the middle was very nice.

I’d also like to note that the texture of the crust for the raw butter tarts was really impressive. I wanted to ask the fellow who made them about what he used but didn’t have the chance. I really know a lot of raw desserts at this point so it takes something to impress me and make me wonder, so actually, for me the crust of those butter tarts was the most interesting thing on the raw plate. I think that if his filling (probably made with date) had a little more of a caramel edge to it, maybe with some lucuma and a touch of yacon and mesquite, he could have been the winner.

4bakersI competed as part of Team Lindy Hop with Kris Light and her P.B. Phone Home squares, Ashley Bratty with her Snickerdoodle Sandwich Spectacular/Snickerdoodles Marsala and Heather O’Shea with her Jazzberry Lemon Cupcakes. I have to admit that all of these desserts (including my own) were so yummy that early on I thought it might be a clean sweep for our entire category. Everything was delicious, but unfortunately Kris and I stood aside to cheer on the 2 winners on our team, Heather and Ashley. Heather even won Best in Show for her cupcakes! You can read more about her entry on her blog here.

This was a really neat experience. I hope to snag some more photos to post soon.

Oh, and my lemon square display made it in to this photo gallery from BlogTO.

Raw Banana Cream Pie

Status

Raw Banana Cream PieIt sure has been a while since my last post! I’ve been busy with my giant Frankie 100 project coming this spring and haven’t been playing in the kitchen much. However, tonight my husband will join me to attend the Conscious Eating Niagara potluck which I haven’t been to in forever, so I thought I’d update the blog with today’s creation.

It’s another case of, a little of this, a little of that. Actually, I had some raw bars in the freezer that I decided to blend up and make in to the pie crust. It’s all about the filling.

Mandi’s Banana Cream Pie

Crust Filling
Almonds

Hazelnuts

Coconut Flour

Dates

Coconut Syrup

Touch of Moroccan Spice Mix (includes chili, ginger, cinnamon)

Bananas, regular & small red bananas

Coconut butter

Real Vanilla Bean

Touch of Himalayan Salt

Stevia


My dad’s excellent Gluten Free bread

Yesterday I had breakfast at my dad’s place and I was really impressed by his homemade Gluten Free bread. This was really one of the best GF breads I’ve ever had. (Obviously not vegan.)

Daddyo Cheese PicIngredients:

1 1/4 cups milk @ 90 degrees
3 large eggs @ room temperature
1/4 cup melted butter
3 tbsp Xylitol
1 tsp apple cider vinegar
1/2 cup Amaranth flour
1/2 cup Oat flour
1/2 cup Brown Rice flour
1/2 cup White Rice flour
1/2 tsp Salt
1/2 cup Potato starch
1/2 cup Tapioca starch
1/2 cup Corn starch
1 tbsp Xanthan Gum
2 1/2 tsp Yeast

Made in the bread machine according to the machine’s instructions.

Recipe by the awesome, Mr. Lorne Gould!

Enjoy!

Raw Peach Squares

I picked up some fresh Niagara peaches at the Peach festival in Niagara on the Lake this weekend. Here’s a little raw recipe that I’ve whipped together for a party tomorrow. As usual, this is a play it by ear recipe.

This is just a quick post so I don’t forget to post about it. I’ll have to grab a photo later when I cut these in to squares. Right now it’s setting in the freezer.

Raw Peach SquaresRaw Peaches n’ Cream Squares

Filling

  • Coconut butter – about 400 grams
  • 8 ripe peaches
  • a touch of stevia, to taste
  • a touch of vanilla
  • a pinch of pink Himalayan salt
  • 1/4 teaspoon ground ginger

Crust:

  • Coconut flour
  • Coconut oil
  • Dates
  • A touch of ground ginger

Directions:

  1. Blitz the coconut butter in the food processor until it makes a smooth cream.
  2. Cut the peaches up in to slices and start to drop them in the food processor until everything is blitzed together.
  3. Add the other ingredients to taste.
  4. Pour batter in to a bowl and set aside on the counter.
  5. No need to clean the food processor. Just throw about half a cup of coconut flour in and start to blitz it, then add dates and some coconut oil until it still starts to come together as a dough. Add more coconut flour as needed.
  6. Use some coconut oil to grease a square pan. I have a flexible non-stick silicone pan that I like for raw desserts. Press the crust in to the bottom, then pour the batter in. Set in freezer for at least 2 hours. Cut in to squares and enjoy!

The flavour has come out quite subtle and creamy and really nice. Let’s see if the drunkers at the party appreciate it or not.

Raw Peach Squares

Fun with Kelp Noodles

kelp with hazelnutI’ve been on a big kelp noodle kick for the past while. My favourite thing to do is to soak the kelp noodles for at least 20 minutes in water, give them a good rinse, and then marinate them in a seed or nut based sauce until they become soft. Really yummy.

One of the recipes that I really enjoy for kelp noodles is a Thai Peanut Sauce. However, peanuts (at least not the ones used in those types of recipes) are not raw and not particularly good for you, so I’ve been playing with replacing them with other nuts. This weekend I made a sauce with hazelnuts for 2 different potlucks and it turned out quite well.

Other times, I’ll use my favourite Garlicky Kale dressing or something similar, or I’ll even use a pre-made pesto.

For a Thai inspired sauce, I use the following ingredients. You have to just play with them to get the flavour that you want:

  • Natural Peanut Butter or some other type of nuts (like hazelnuts) soaked and rinsed before using
  • Water
  • Lime juice
  • Ginger
  • Garlic
  • Chilis or a hot sauce like Sriracha
  • Coconut Aminos, Tamari, Miso or salt for seasoning
  • Agave for sweetness (or another sweetener)
  • Cilantro or mint, and lots of it!

I like this kind of sauce with zucchini noodles too, and lately I’ve been mixing the zucchini noodles in with the kelp noodles. Just don’t add the zucchini until the end since it can produce too much water.

Who’s Kale?

who's kale

The Kale Recipe everyone’s talking about – Who’s Kale? 

  • 1 bunch raw kale, washed, de-stemmed and dried
  • 2 Tablespoons tahini
  • 2 Tablespoons apple cider vinegar
  • 2 Tablespoons lemon juice (I like a little less, like 1 tbsp, or just more apple cider vinegar)
  • 2 Tablespoons coconut aminos (originally called for Bragg’s liquid aminos, or tamari or soy sauce would work, or just add salt to taste)
  • 4 Tablespoons nutritional yeast (I generally use a lot more – yum!)
  • 2 teaspoons minced garlic (1 – 2 cloves of garlic, when I’m lazy I use garlic powder

Optional:

  • .5+ teaspoon of dijon mustard
  • sesame seeds, to taste as garish (optional)
  1. Break or cut kale into bite size pieces and place in a large bowl.
  2. Puree all ingredients except kale and sesame seeds in a blender or food processor to blend the dressing.
  3. Pour dressing over kale and massage into the kale with your hands until all pieces of kale are coated.
  4. Let the salad sit in the fridge for an hour or so to marinate. You can skip this step if you need to eat right away, but allowing some time to marinate will wilt the kale a bit and make it a little more palatable – particularly for those who are skeptical of eating raw kale.
  5. Sprinkle on some sesame seeds before serving if so desired.

Credit to the original internet source: http://www.eatingbirdfood.com/2011/02/garlicky-kale/

***

Last Sunday was Niagara VegFest. Among many other great purchases, I picked up a couple of I “heart” kale buttons and a bag. 2 days later, I was riding the subway in Toronto late at night and a guy asked me, “Who’s Kale?” which has now become the running joke.

So how do I eat all this kale?

I already loved Kale Chips, but it was the Garlicky Kale from Whole Foods is the recipe that started my real love affair with kale.

  • Kale Chips
  • Garlicky Kale from Whole Foods
  • Kale salads of all sorts are delicious. Make sure to massage the dressing into the washed, de-stemmed kale so that it really softens and marinates.
  • In juice: I keep the kale stems and use them for juicing. One of my favourite combinations is kale with pear. Kale + pear are a wonderful pair!
  • In smoothies: Since I eat so much kale at other times of the day, I tend to favour spinach in my morning smoothies, but kale often makes an appearance too.
  • When I’m on the go in Toronto, I seek out kale salads from restaurants like:I heart kale
  1. Freshii 
  2. Fresh
  3. Urban Herbivore
  4. Vegetarian Haven

Some people only think of kale as a cooked food but I really prefer it raw. Eating it raw has completely changed my view of this super green, and I really find it much more satisfying than other lettuces or baby spinach for salads.

Wikipedia has this to say about kale:

Kale or borecole (Brassica oleracea Acephala Group) is a vegetable with green or purple leaves, in which the central leaves do not form a head. It is considered to be closer to wild cabbagethan most domesticated forms. The species Brassica oleracea contains a wide array of vegetables, including broccolicauliflowercollard greens, and brussels sprouts. The cultivar groupAcephala also includes spring greens and collard greens, which are extremely similar genetically.

Want to know more about the various varieties of kale? Check out ilovekale.com.


Staying healthy and vegetarian at Disney World

Mandi Geoff Hollywood
My husband and I just got back from 8 days at Walt Disney World in Florida. We had a great trip!

Something that was very important for me was staying healthy while away. If I was going to indulge, I wanted to make sure it was worth it, not just eating out of excess. It’s tricky in an environment like an amusement park but overall, I’m very happy with the balance that I found.

At home I’m vegan and gluten-free but I fell off the wagon while we were away. C’est la vie. Back in the saddle again now that I’m home.

Morning Smoothies
This is the first time that I’ve ever traveled with a Magic Bullet and I’ll never go on a trip without one again. It was awesome! We were staying at Disney’s Caribbean Beach Resort and I was able to have groceries delivered directly to the hotel from www.GardenGrocer.com in Orlando. This worked out perfectly! I brought my own Sun Warrior Vanilla protein powder and a blend of some superfoods which I used to supplement my green smoothies with the groceries I bought. For 8 days of smoothies for 2 people, an ideal order would be 2 packages of pre-washed baby spinach, 3 containers of fresh blueberries, 3 containers of fresh strawberries and 16 bananas. (I also ordered apples and celery for snacks and cereal and almond milk for my husband. I just had my usual smoothie for breakfast and that was the important thing.)

Geoff Big Thunder SMSalad “Jazz” Packs
I packed several ziplocks to make my favourite “Jazz” packs for when I got stuck eating any small or unsubstantial salads. I really recommend keeping a jazz pack in your purse or bag in general. It relieves a lot of pressure when you’re trying to pick a restaurant with someone who isn’t as health conscious as you are. Even if you have a pretty lousy salad, topped with your favourite nuts, seeds, dried fruit, eggplant bacon, nori, nutritional yeast, etc. you can turn mediocre into delicious.

Jogging Gear

Though we were already walking a lot all day long at the parks, it felt really good to go for a short run around the lake at our resort to start the day. It was only 13 minutes to run around the lake before Geoff woke up, but it was definitely worth packing my workout wear for the bit of exercise but mostly for the fresh air.

Disney’s Magic Kingdom

Liberty Square Market, Magic Kingdom (beside the President’s) – Market Stand

Hands down, the best kept secret in any of the parks is the Roasted Sweet Potato for just $3.29 at the Liberty Square Market beside the President’s show. They’re completely hidden other than a small sign which I saw at the last minute. They were hidden somewhere behind the counter but when I asked the cast member brought out a giant, perfectly roasted sweet potato. Butter comes on the side so skip it if you want to stay vegan, a little salt and pepper and voila! The best deal and tastiest healthy snack or meal around the parks.

Cosmic Ray’s – Tomorrowland –  Magic Kindom – Quick Service (Bay 3)

I had the Greek Salad ($7.99) at Cosmic Ray’s. The good thing about the food at Cosmic Ray’s is that they have a toppings bar so you can bulk up your salad, and I also added a jazz pack for this one. It became quite a huge salad with my jazz pack and the experience was made thoroughly enjoyable when we grabbed a seat near Sonny Eclipse to watch his show. Loved the character entertainment. I’m surprised there isn’t more of that sort of thing at the restaurants around the parks.

Be Our Guest – Fantasyland – Magic Kingdom – Mid-Service at lunch, Full Table Service at dinner

Quinoa Salad Be Our GuestReservations for dinner at the new restaurant below Belle’s castle in Fantasyland need to be made months in advance. It’s brand new, quite special and extremely popular. Dinner it’s a full service restaurant but at lunch it’s reservation-free for mid-service (you order but then they bring the food to your table) so if you’re willing to line up, you can experience the terrific ambience and also food that’s actually quite a good value. Though we had our smoothies at home, on the spur of the moment we decided to line up at 10am to have “brunch” right when they opened at 10:30am so that we could experience the new digs. It was worth the 30 minute wait to have a peak in there. I had the vegan Quinoa Salad – with green beens, potatoes, olives, roasted bell peppers and tomatoes $9.99. After ordering it at the front, they use a homing device to find you wherever you’ve decided to sit. There are 3 halls and we opted for the West Wing which is the creepy room where the rose is on display. It was very fun and my salad was quite good for a $10 Disney meal.

Near Magic Kingdom

Kona Cafe – Polynesian Resort – Table Service

Kona SaladA short monorail ride away, you can opt for a more peaceful lunch at one of the 3 area resorts. We stopped at the Kona Cafe for lunch on the only day that it rained. The atmosphere in the actual cafe is nothing special but it was nice to look around the Polynesian. I had the Kona Salad – mixed greens, blue cheese, fresh fruit, red onions, smoked almonds with a citrus vinaigrette $8.49. It was a nice salad, but appetizer size. It was nice enough that I didn’t add a jazz pack and it’s a good salad to have on a day when you might want a bigger dinner or an afternoon snack.

Disney’s Epcot

Best Salad Sunshine Seasons Beet Goat Cheese Epcot LandSunshine Seasons – The Land – Future World – Epcot – Quick Service

The best salad at Disney World. People talk about it all over the internet. It’s fresh, hearty, reasonably priced and delicious! Not only is this a fabulous salad at Disney World, it’s an outstanding salad in “the real world” too. If you’re vegan you can have them skip the goat cheese and give you more beets or extra walnuts. It’s listed as Roasted Beets and Goat Cheese Salad – with Honey Sherry dressing $7.89 but it’s also served with tons of delicious candied walnuts and a flat bread. If you only eat one salad your entire visit, this should be the one.

Coral Reef – Living Seas – Epcot

For my birthday lunch we went to the Coral Reef for the atmosphere more than for the food. I don’t understand how people can watch all the beautiful fish swimming in the aquarium… while they’re eating them! I asked them if they could make an entree size version of the appetizer salad so they doubled it for me (and the price): Field Greens and Endive Salad – with pears, goat cheese, spiced walnuts, and cranberry vinaigrette $8.49. The only problem with asking for an entree size version of this salad was that they gave me an extra ball of goat cheese which was delicious but boy, what a lot of dairy.

Vegan Red Thai Noodles Coral Reef
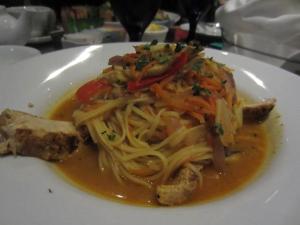
This is where it’s worth mentioning that my husband had the vegan Red Curry Vegetable and Noodle Bowl – with Gardein Chick’n Breast $18.99 which is with a mock soy chicken product. I don’t tolerate soy very well but I did have a few bites and it was tasty.

San Angel Inn – Mexico – World Showcase – Epcot

This was another splurge meal for us. This is a really ambient pavilion and one that I knew we would want to hit some time over the week. We went for lunch and I considered having a salad or the something from the vegan menu, but I decided that if I was falling off the dairy wagon while I was away, Mexican was one of the nicest places to enjoy a bit of cheese.

We split the Tostados de Tinga but asked for them to be made vegetarian. These are fried corn tortillas topped with black beans, lettuce, onions, advocado, tomato marinated chicken (usually), sour cream, and fresh cheese $10.50. I didn’t really want to get an appetizer because I was also enjoying the green sauce that came with the tortilla chips at the table but my husband was really hungry so we had a pretty giant lunch.

I had also ordered a vegetarian (but not vegan) version of the Enchiladas. These ended up being made with a LOT of cheese and it was really over the top but now I don’t have to eat cheese again for a looooooong time. On the menu they’re listed as: Enchiladas Verdes de Pollo – Corn tortillas filled with pulled chicken (usually), covered with green tomatillo sauce, topped with sour cream, queso fresco and onion, served with black beans $17.50 and then I had them make them vegetarian. That was a huge meal. Next time, I’ll ask for black bean instead of cheese.

At Epcot, we would also recommend Tokyo Dining at the Japan pavilion for anyone who eats fish. There isn’t a lot for the vegetarian menu but Geoff really enjoyed his meal and the food is quite healthy if you skip any tempura.

Disney’s Hollywood Studios

Back Lot Express, Hollywood Studios (near Star Tours) – Quick Service

We actually ended up here twice because there are fewer options at Hollywood Studios unless you’ve made a reservation in advance. From my research and now my own experience, this is really the best option for quick service at Hollywood Studios. One day I had the Cucumber & Cantaloupe Salad which is actually a really nice little salad but it needed one of my jazz packs to make it into a satisfying lunch. On a different day which was quite cold, I wanted something more substantial so I had the Grilled Vegetable Sandwich. I didn’t stay vegan on this and did have it with the provolone cheese. It’s a quite large sandwich and the grilling does make it pretty tasty. You can have it served with fries but I had mine with the option of baby carrots. The salad isn’t listed on the website for some reason but the sandwich is described as: “Grilled Vegetable Sandwich – basil asiago artisan bread, mushrooms, red peppers, zucchini, tomato, watercress and cheese with sundried tomato pesto, served with carrot sticks or french fries $8.99.”

Disney’s Animal Kingdom

Vegetarian Stand between Africa and Mount Everest, Animal Kindom – Quick Service

I can’t find the name of this little kiosk but along the back route of the park somewhere near the Bird’s of Flight show there’s a vegetarian stand that sells edamame, salad rolls, fruit… I’m really impressed that there’s actually a stand that’s 100% vegetarian! It’s small, but the fact that it exists is promising. We had 2 orders of the cold salad rolls with peanut sauce. Great snack or small meal and I definitely felt good about supporting this concept.

Near the Animal Kingdom

Sanaa – Kidani Village – Animal Kingdom Villas

I would call this the best meal of the trip. It was also our largest. We went a bit over board ordering appetizers as well as our meals, and they mixed up my order for the vegetarian sampler so they ended up giving me an extra dish of 3 options instead of 2. Long story, but I did get to try a lot at this place and I would definitely recommend it as the best vegan option at Disney.

Sanaa AppetizersWe started with the Sampler for Two – Potato and Pea Samosamb Kefta Kabobs, Roasted Cauliflower $14.99. I would actually skip this next time. My husband ate both the meat kabobs and I ate all the cauliflower, but the cauliflower was really nothing special. The samosas were nice, they seemed like they may have been baked because they weren’t oily. Mostly the mango salsa was the highlight. The salad sampler was better than this appetizer sampler though.

SALAD SAMPLER – CHOICE OF THREE SALADS $6.99

We had the Bhel Puri, Golden Lentils and Tomato and Watermelon, cucumber and fennel. The watermelon salad sounded more interesting than it was. Nothing special, so next time I would pass on that one but the other 2 salads were excellent. I’d opt for the beets next time as my third choice.

VEGETARIAN SAMPLER – CHOICE OF TWO SERVED WITH BASMATI RICE OR FIVE-GRAIN PILAF $14.99

Sanaa VegThis is where the mix up happened because my waitress took my order down wrong. As a result I was able to try 3 of the vegetarian options instead of 2. Along with the five-grain pilaf I had the Paneer Tikka (not vegan), Spicy Peas, chickpeas and potatoes (vegan) and Vindaloo-style vegetables (vegan). Let me tell you, it was pleasantly spicy! I like spice, but I was shocked that they actually made it that hot at Disney. It was a very filling splurge meal. We were so full we skipped dinner that night. I would go there again, and make sure to make it my main meal of the day again too.

Jiko – The Cooking Place – Animal Kingdom Lodge – Full Table Service

Jiko DipsWe made reservations to go back to the Animal Kingdom Lodge for a nice Sunday dinner at Jiko. Jiko was very nice, but the food wasn’t as exotic as Sanaa. Still, it was a nice experience. They bring bread to the table with a fancy butter so I only opted to share the appetizer dips with my husband and have a salad rather than trying the full vegan entree on the menu.


Jiko Salad
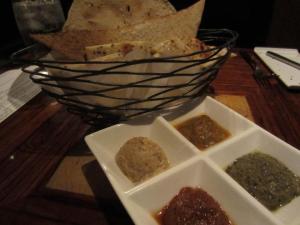
The dips were the Taste of Africa – African inspired Dips with pappadam, poppy seed lavosh and House-made Naan $9.00 which were ok but not really anything too special. It ended up being so many carbs since they had also brought the yummy bread to the table first. Then I had the Jiko Salad – bitter greens, frog hallow pears, spicy glazed walnuts, aged goat cheese and citrus vinaigrette $12.00 which wasn’t a huge salad but it was just right since I had already carbed out on the starters.

Downtown Disney

Wolfgang Puck Express, Downtown Disney

Wolfgang Puck Express Beet Goat Cheese saladI’m calling this mid-service because you order but then they bring the food to your table. We really enjoyed this option for a reasonably priced dinner the one night we went do Downtown Disney. I had the Butternut Squash Soup – Roasted red pepper coulis and chives $5.95 and the Roasted Beets Salad – Goat cheese, oranges, fresh greens, candied pecans, balsamic vinaigrette $10.95. The soup was really delicious. The salad was good too, but I’m glad that I had the soup because it wasn’t a particularly large salad on it’s own. Still, very tasty.

****

Treats – if you’re going to indulge, do it right!

Alright people, if you’re going to indulge then make it count! Though I admit that we had some other treats over the week including splitting a funnel cake at Sleepy Hollow while we watched the fire works, I think it’s important to pick the high calorie treats that are actually worth it. There is so much crap around, and it’s not even good! When you have a treat, quality counts.

Boulangerie Patisserie – France – World Showcase – Epcot

Ah, the France pavilion. We stopped at the Boulangerie on several different days and also packed a couple of treats as our dinner for the airplane ride home. Are the pastries as good as those in Paris? Well, no. But they’re still really good. Freshly made and if you’re going to indulge, this is the place to do it. The Napoleon – puff pastry with layered cream $4.50, is more creamy and not particularly sweet by “American” standards. Rich and light at the same time. It’s not listed on the menu but they’re also now serving an oversized and very delicious Macaron with white chocolate mousse, basil gelee, passion fruit macaroon and chartreuse sorbet for about $6.00. On the plane ride home Geoff and I split a Frangipane – almond filling between puff pastry $3.70 which was delicious, a Pain Au Chocolat – chocolate croissant $3.35 which wasn’t as good as the Frangipane so I would pass on that next time, and a Brioche Au Chocolat – chocolate brioche $3.50 which was also very good.

Italy Gelato Stand – Italy – World Showcase – Epcot

Though it wasn’t a traditional cannoli, it was still very tasty. The problem with cannolis is that if you have them made fresh they can be absolutely delicious and worth every bite, but if they get soggy they’re gross and truly disappointing. The Italian pavilion got around this by making the pastry more of a cookie that was covered in chocolate. Not completely traditional, but definitely something that I enjoyed. Cannoli – Crisp pastry with sweet ricotta, chocolate, Candied Orange $4.75.

Kringla Bakeri og Cafe – Norway – World Showcase – Epcot

I’ve spent a lot of time in Sweden which shares a lot of similarities to Norway in both culture and food. I found the School Bread $2.69 to be a perfect treat with the familiar and nostalgic flavours of my time spent in Stockholm.

Sleepy Hollow – Liberty Square – Magic Kingdom – Quick Service

We ended up buying breakfast on our last morning. It’s not listed on their menu but Sleepy Hollow is one of the only options for anything breakfast-like foods around the Magic Kingdom. I guess they have options on Main Street USA but once you enter the actual parks there’s nothing around. I had gone for a jog that morning and only ate an apple so by the time we had been at the park for an hour I was really hungry. I had hoped to buy another sweet potato but they weren’t available in the morning so I let myself indulged in a Breakfast Waffle with egg & Swiss cheese. It comes with prosciutto which I of course skipped. It was actually a pretty tasty indulgence and I don’t feel too guilty about it.

Hollywood Brown Derby – Disney’s Hollywood Studios – Full Service

Grapefruit Cake Brown DerbyHappy birthday to me. My birthday fell during our trip and I decided that if I was going to have cake, it had better be good. I had the classic and rather famous Grapefruit Cake – Light Layers of Yellow Cake with fresh Grapefruit-Cream Cheese Icing $8.00. It was worth the treat. And I admit it… I had a spiked fancy coffee too!

Minnie Ears SM

Raw Cinnamon Bun & Raw Cheese Ball for the January 5th potluck

Not sure when I’ll get the full recipes written out, but this is what I took to the potluck with ingredients.

Colossal Cinnamon Bun

Ingredients – all raw

Cinnamon Bun:

  • Almonds
  • Coconut Syrup
  • Coconut Oil
  • Dates
  • Coconut Flour
Icing:

  • Coconut Butter
  • Coconut Oil
  • Agave


Raw Cinnamon Bun

Holiday Cheese Ball

& Onion Crackers

Ingredients – all raw

Cheese Ball:

  • Onion, Tomato, Garlic, Red Bell Pepper, Parsley , ground Pecans on the outside
  • Health Nut Cashew Cheese
    • Cashews
    • Vegan Probiotics
    • Himalayan Salt
    • Health Nut Cheddar Style Cheese
      • Cashews
      • Vegan Probiotics
      • Himalayan Salt
      • Nutritional Yeast
      • Garlic
      • Onion
      • Mustard
      • Tumeric
Onion Crackers:

  • Onion
  • Flax
  • Coconut Aminos
  • Olive Oil

Cheese Ball

My favourite recipes around the web

Six days ago I looked up one of my favourite recipes to share on a message board that I
mandinaughtyfrequent. I pulled up the recipe as I always do and linked it. I’m terrible about shutting down the computer so I actually I kept the recipe open in a browser for a couple of days and only yesterday went ahead and closed the browser; I knew that I could just look it up again today when it was time to use it. Right? Wrong! Today I went to make the recipe, the blog had suddenly gone private! No more access for me! Gah! How terrible!

Luckily, someone I know had copied it down so I’ve been saved. Now I’ve decided that I’d better keep a post where I can include a lot of my favourite recipes from around the internet *in case* they should disappear. So voila! My favourite recipes from around the web.

I’m not really one to follow recipes in great detail, but I make an exception for the following recipes which are either perfect as they are or have been very inspirational to me. 

Raw Lulu’s New & Improved Raw Onion Bread

  • 2 large onions (sweet onions work best)
  • 1 cup flax meal
  • 1/4 cup namo shoyu
  • 1/4 cup water
  • 1/4 cup olive oil
  • Process onions in food processor a few seconds. Add remaining ingredients. When combined flatten
  • mixture on teflex sheets and dehydrate at 115 degrees 12-16 hours.

who's kaleGarlicky Dressing for Gartlicky Kale Salad (Whole Foods Garlicky Kale) 
*AS OF JUNE 9th, WE’RE NOW FONDLY CALLING THIS RECIPE:
WHO’S KALE?

  • 2 Tablespoons tahini
  • 2 Tablespoons apple cider vinegar
  • 2 Tablespoons lemon juice (I like a little less, like 1 tbsp, or just more apple cider vinegar)
  • 2 Tablespoons coconut aminos (originally called for Bragg’s liquid aminos, or tamari or soy sauce would work, or just add salt to taste)
  • 4 Tablespoons nutritional yeast (I generally use a lot more – yum!)
  • 2 teaspoons minced garlic (1 – 2 cloves of garlic, when I’m lazy I use garlic powder
  • Optional:
    • .5+ teaspoon of dijon mustard
    • sesame seeds, to taste as garish (optional)
  1. Puree all ingredients (except sesame seeds) in a blender or food processor to blend the dressing. 
  2. Sprinkle on some sesame seeds before serving if so desired.

For a delicious kale salad: 

  1. Wash, dry and remove your kale from the stems first. You can save your kale stems for juicing.
  2. Break or cut kale into bite size pieces and place in a large bowl.
  3. Pour dressing over kale and massage into the kale with your hands until all pieces of kale are coated.
  4. Let the salad sit in the fridge for an hour or so to marinate. You can skip this step if you need to eat right away, but allowing some time to marinate will wilt the kale a bit and make it a little more supple – particularly for those who are skeptical of eating raw kale.

The Best Raw Vegan Caesar Salad Dressing/Dip

  • 1/4 cup raw cashews (or raw sunflower seeds)
  • 1/8 cup raw sesame seeds (or raw pine nuts) or 2 tbsp tahini
  • 1/8-1/4 cup sunflower seeds (depending how thick you want it)
  • 3-4 tbsp freshly squeezed lemon juice
  • 1-2 medium cloves garlic, chopped
  • 1 1/2 tsp mild miso (I use Genmai soy and brown rice miso)
  • 1/4 tsp kelp granules or other seaweed seasoning *optional
  • 1/2 tsp of dried dill
  • 2 dates or 1-2 tsp agave or other liquid sweetener
  • 1/2-2/3 cup filtered water (to thin as desired)
  • freshly ground black pepper to taste
  1. Using a hand blender or in a regular blender, combine all ingredients(starting with 1 date or 1/2 tsp agave nectar) and purée until very smooth.
  2. Taste test. Add additional dates or agave nectar, garlic or lemon if desired to achieve the taste you are looking for.
  3. Add additional water to thin dressing if desired.
  4. Yields about 1 cup, which covers more than 2 heads of romaine hearts chopped.
*This is pretty good with zucchini noodles but REALLY good with kelp noodles, especially if you rinse your kelp and then marinate your noodles in advance. I like to make this a day in advance and the noodles get really soft and it’s just like eating a real alfredo dish. I’m telling you, it’s delicious with kelp.
  • 4 small zucchinis (or 1 large bag of kelp noodles or 2 small bags of kelp noodles)
  • 1 cup raw cashews, soaked in water for 20 minutes and drained
  • ¾ cup water (you can start with 1/2 cup and then add as needed)
  • 1 tbsp lemon juice
  • ¼ tsp nutmeg
  • 1 tsp thyme (this is important, it really makes the recipe)
  • 2 garlic cloves (I like 3)
  • salt & pepper, to taste
  • 1 tbsp light miso paste (optional – look for unpasteurized miso to make this 100% raw)
  • 2 tbsp nutritional yeast (optional)
  1. To make the zucchini noodles: Using a vegetable peeler, remove the skin from the zucchinis and discard. Starting from one end of the zucchini, peel a long ribbon of flesh down to the other end of the zucchini. Turn the zucchini and repeat this step around the entire zucchini, until the core is so small that it is difficult to peel. Repeat this step for the other zucchinis.
  2. To make the raw Alfredo sauce: combine the remaining ingredients in a food processor and blend until smooth.
  3. Place half of the zucchini noodles in a serving bowl and gently stir half the sauce through it. Repeat for the remaining noodles and sauce. Serve with a sprinkle of fresh basil or parsley.

Raw French Dressing

I shouldn’t really post this one because it is from a book, not the internet, but it’s Doug McNish‘s raw French dressing from Eat Raw, Eat Well and I’ve been hooked on it the past couple of weeks and would like to be able to look it up when I’m not at home too. I’ve listed the adjustments that I make.

  • .25 cup dry-packed sun dried tomatoes, soaked in water for about 20 minutes
  • 3 chopped pitted dates, soaked in water for about 20 minutes
  • 1.5 cups extra virgin olive oil (I only use .25 cup and then add water until it’s as thick as I’d like it to be)
  • .25 cup apple cider vinegar
  • 2 tsp wheat-free tamari (coconut aminos are good too)
  • 2 cloves garlic
  • .5 tsp basil
  • .5 tsp oregano (I skip it)
  • .5 tsp mustard powder
  • .5 tsp fresh ground black pepper (I skip it)

Blitz in the Vitamix/food processor and enjoy over your favourite salad. Nice with kelp noodles too.

Raw Eggplant “Bacon”

Makes about 20 thin slices, or sized according to your eggplant

1 large eggplant, sliced lengthwise into thin slices (1/4 inch thick or less, the thinner the better IMO)
2 tbsp tamari
2 tbsp maple syrup (I used 3 tbsp)
2 tbsp apple cider vinegar
2 tbsp olive oil
1 tsp chili powder
3-5 drops liquid smoke (I used at least 5, maybe 6)
1/4 tsp smoked paprika (or 1 tsp regular)
Black pepper to taste

Optional add-ins: garlic, tomato sauce, cumin, cayenne pepper, mesquite powder (I use mesquite, yummy!)

1) Mix all marinade ingredients (tamari through pepper) together. Submerge eggplant slices well, and let marinade for at least an hour.

2) Place slices in a dehydrator and dehydrate at 115 degrees till totally dry: this should take about 12 hours. For crispier bacon, dehydrate longer.

If you don’t have a dehydrator, you can bake these at 350 for about 45 minutes, occasionally basting them with marinade.

Spaghetti Love

    • 1 ripe Roma tomato
    • 1/2 cup sun-dried tomato slices
    • 1 garlic clove
    • 1 date or 1 TB raisins works too
    • 1/4 cup chopped red bell pepper
    • 1 teaspoon dried Italian seasonings
    • 1 teaspoon fennel seed
    • 1/4-1/2 mango to make it creamy

feel free to add:

  • a couple tablespoons fresh basil
  • a bit of chopped hot chilies
  • dulse or celery for salt flavor
  1. Blend in a Vita Mix blender until smooth. I like to add 1/2 cup of chopped tomatoes for a chunky sauce.
  2. Serve on top vegetable noodles. Shred vegetables with a cheese grater or spiral slicer. Vegetable such as zucchini, jicama, and any other root veggie work wonderfully.

Renegade Health Kale Chips

  • 2 head Kale, Washed and Torn
  • ¾ cup Tahini
  • ¼ cup Tamari
  • 1/4 cup Cider Vinegar
  • ½ cup Water
  • 2 scallions
  • 1 clove garlic
  • 1 lemon (juice of)
  • ¼ teaspoon Sea Salt
  • 1/4 cup of nutritional yeast

Place kale in a large mixing bowl. Combine the rest of the ingredients in a blender and blend until smooth to get a thick consistency. You may have to add more water. Pour over kale and mix thoroughly with your hands to coat the kale. You want this mixture to be really glued onto the kale.
Place kale onto a Teflex sheet, on top of a mesh dehydrator screen, and dehydrate for 6 hours @ 115 degrees. You’ll need to use two trays. Rotate kale occasionally to dry uniformly.

Oh She Glows Kale Chips / Doug McNish Kale Chips (actually, I haven’t made this exact recipe yet but I don’t want to lose it)

“Sour Cream” and Onion Kale Chips

  • 1 1/2 cups raw cashews, soaked for 2 to 3 hours
  • 4 Tbsp lemon juice
  • 1 1/2 Tbsp raw apple cider vinegar
  • 1/4 tsp sea salt
  • 1 small red onion, sliced thin on a mandolin
  • 1 head of green kale
  • 1/4 to 1/2 cup filtered water
  1. Starting at the bottom of the kale, strip away all leaves leaving behind only the stems. Tear leaves into approximately 2- to 3-inch pieces.
  2. In a blender, combine the soaked cashews, lemon juice, vinegar, salt and 1/4 cup water until creamy and smooth. Sauce should be the consistency of a salad dressing. Add more water if necessary.
  3. Using mandolin, thinly shave red onion. Toss the sauce with the kale and red onion until thoroughly combined and lay out on dehydrator sheets. Dehydrate at 105 degrees for approximately 12 hours or until crispy.

Andy’s Raw Vanilla Ice Cream Base

  • 1 Cup cashews (no need to soak)
  • 1 1/2 Cup water
  • 1/3 Cup raw agave
  • 1/4 tsp salt (+/-)
  • 1/3 Cup raisins (This is the secret ingredient that imparts the rich/buttery flavor)
  • 1 vanilla bean
  • 1-2 Tbsp Cacao butter or Coconut oil or young coconut meat
  1. Take all the above ingredients and blend in Vitamix for a couple of minutes…or at least until all the solids have blended away.
  2. NOW, pour the mixture through a sprout bag. This will catch all of the tiny cashew/vanilla bean particles, and make the final product much more silky smooth. 
  3. Follow ice cream machine instructions.

Carmella’s ‘Super’ Caramel Chocolate Tarts – Makes 6 tarts

Chocolate Brownie Crust

Process nuts, cacao and carob powders and sea salt in food processor until fine. Add dates, agave and vanilla extract and process until crumbly.

Super Caramel

Mix first set of ingredients by hand in a bowl. Add more water if too thick. Fold in pecan pieces.

Dark Chocolate Ganache

Sift cacao and/or carob powder into a bowl. Add other ingredients and mix well with a spoon or whisk.

Carmella’s Notes:
If the mixture thickens too quickly due to the agave or maple syrup being colder, no worries! Just pop the bowl in the D for a few minutes to soften it up.
~ As you can see in the picture below, the Dark Chocolate topping had actually thickened up a bit by the time we were ready to assemble the tarts, but it still worked out just fine.

Assembly

  • Press Chocolate Brownie Crust in small tart shells with removable bottoms.
  • Pour some Super Caramel on crust.
  • Cover with a layer of Dark Chocolate Ganache.
  • Decorate with walnuts and pecans.
  • Set in fridge.
  • Demold and enjoy in good company!

Chocolate Pecan Pie

This recipe includes a few components so I’m going to list them in the order that I made them:

1 Cup of Date Paste (here’s what I used since I cut the recipe almost in half)

  • 20 pitted medjool dates
  • 1 1/2 cups of water (and a couple teaspoons extra)

Soak dates in the water for 20 minutes, massaging them with your hands for a minute. Drain dates but reserve the soaking water.

Place dates in food processor along with a bit over 1/4 cup of soak water and blend until smooth. .

Almond Pecan Crust

  • 3/4 cup of unsoaked almonds
  • 3/4 cup of unsoaked pecans (recipe calls for 1/2 cup)
  • 8 pitted medjool dates
  • 1/8 teaspoon of sea salt

Place almonds and sea salt in the food processor and process until coarsely ground. Add the pecans and process until both nuts are finely ground. Add the dates and process until mixture begins to stick together. Don’t overprocess. Form a pie crust in a 9 inch pie plate or tart pan. I used a pie plate.

3/4 cup of Chocolate Ganache

  • 3/4 cup of dark agave syrup or maple syrup (I used mostly dark agave with a bit of maple syrup)
  • 3/4 cup of cacao powder
  • 1/3 cup of virgin coconut oil, melted (in dehydrator)
  • 1/8 teaspoon plus pinch of sea salt

Blend everything in the Vitamix until smooth. Add most of it on top of the crust. Scatter 3/4 cups of pecans on top of the ganache. Press down with your hand. Put in the fridge while making the filling.

Filling

  • 3/4 cup of water
  • 1/2 teaspoon of agar flakes
  • 1 cup of date paste from above
  • 1 tablespoon of dark agave or maple syrup (I used maple syrup since I live in Vermont)
  • 1 teaspoon of vanilla extract
  • 1/8 teaspoon of sea salt

Place the water and agar flakes in a small saucepan on the stove and let soak for 5-10 minutes. Bring to a boil, lower heat, and simmer for 5 minutes, whisking occasionally. Remove from the heat and cool slightly.

Place the date paste, maple syrup or agave, vanilla extract, and sea salt in the food processor and process until smooth. Add the agar mixture and process until blended.

Spread the date mixture evenly over the ganache and pecans with an offset spatula. Scatter the remaining 1/2 to 1 cup of pecans on top, pressing them down slightly. Chill in the refrigerator for at least 2 hours before serving.

Q. How do you make raw halvah?

Q. Hi there I was looking on google for raw halvah recipes and I saw a picture of your halvah with date icing but couldn’t find the recipe and I was wondering if there was anyway you would mind sharing it or pointing me in the direction of a good one.

Raw halvah squares topped with date icing. I think that all halvah must be raw?

A. Hi, you’re right! I originally made that recipe and took a photo before my blog was up.

Here’s how you do it. It’s pretty easy. The key is to have a really good food processor or vitamix to make the coconut butter, or to buy/order coconut butter.
You need equal parts sesame seeds and unsweetened coconut flakes OR raw tahini and already made coconut butter. And a sweetener like coconut syrup, agave, raw honey or maple syrup. Add that to taste. If you’re using about 400 grams each of coconut and sesame, about 1/3 of a cup of sweetener is usually enough for me but you can taste it to see how you like it.  I like coconut syrup but any of those will work. You can use a little Himalayan salt to taste.
You need to blitz the coconut butter first. If you’re making your own coconut butter, blitz the coconut flakes and a couple of tablespoons of coconut oil to help it come together. That takes at least 5 minutes to really become creamy and a good machine is important. Then add your seeds or tahini and a hint of salt. Only at the very end should you add the sweetener. If you add it too soon it becomes too sticky and the rest won’t blend. When you add the sweetener, don’t over blend. Just pulse a few times until it comes together.
Then spread it in to a pan of some kind and let it set in the fridge or freezer. It will harden into a delicious halvah.
The date icing was really just blitzed dates that I spread on top which was tasty but optional.
Let me know if you have any questions.

Vegan Peanut Butter Pie (or Vegan Peanut Butter Cups) – GF & mostly raw

This is basically a raw dessert, except for the peanuts are roasted. But it’s hard to beat that roasted peanut butter taste, so I’m taking one for the team on this one.

I’ve know that coconut butter would be the perfect way to thicken a peanut butter filling since I started playing with coconut butter in desserts a couple of years ago. It didn’t let me down!

Jaime and Krister are awesome. They had elephants at their wedding!

I pulled this out for my dear friends, Jaime and Krister’s going away party. They’re moving to Boulder this week. We’re going to miss them!

This recipe is definitely approximate. Adjust ingredients to taste. The main thing is to use equal parts coconut butter & peanut butter.

Ingredients

  • 400g coconut butter
  • 400g natural peanut butter
  • 1/3 to 1/2 a cup of coconut syrup, to taste
  • pinch of Himalayan salt

Crust

  • Dates & Coconut Flour in aproximately equal parts. About 1.5 cups of each.

Chocolate layer

  • Coconut oil, aprox 1 to 1.5 cups
  • Raw cacao powder, aprox 1 cup
  • 1/4 tsp of NOW stevia or to taste
  • Himalayan salt to taste, optional

Directions

Make the crust first. Blend your dates into mush in the food processor, then slowly add your coconut flour until it makes a dough. Grease a pie plate or springform pan with coconut oil, sprinkle with some coconut flour so the crust won’t stick, then press the dough in.

In the same food processor, blend your coconut butter until soft and smooth. Add the peanut butter, then the salt. Add your coconut syrup last. Don’t over blend once you’ve added the coconut syrup. Adjust the amount of syrup according to taste. Pour the peanut butter mixture onto the pie crust. It appears very liquidy but it will solidify. Chill in the freezer while you prepare the chocolate layer.

For the chocolate layer. gently warm up your coconut oil to get it to melt by putting it in the dehydrator or near something warm. If you’re not concerned about keeping the recipe raw, you can just set this up as a double boiler setup in a metal bowl over another filled with boiling or hot water. Once the coconut oil is melted, whisk in the other ingredients. Adjust the stevia in the recipe carefully. You don’t need the chocolate layer to be very sweet since the peanut butter filling is sweet. Pull the pie from the freezer and pour the chocolate layer over the top. Then put it back in the fridge or freezer to set. Let it set for about 4 hours before serving, or however long you want in the freezer.

I froze mine a week in advance and brought it out at a party today. It was a big hit!

I plan to use the same recipe to make peanut butter cups. It’s just that with little individual cups, it will be much harder not to pig out on them!

Making your own raw vegan milk, Part II

Ingredients: raw nut butter of choice (I’ve used one of my favourite Health Nut flavours but any raw nut butter will do) and sunflower lecithin.

Frothy after being shaken up.

A fine strainer.

Strain your milk.

Before leaving for Sweden, I prepared some very portable vegan oat milk powder to take away with me.

That worked out really well, and I enjoyed it very much in my morning smoothies.

Now that I’m back in town, I’ve decided to go raw for the month of August in honour of Rawstock Niagara, an exciting festival that I’m helping to organize that takes place at the end of this month. As usual, I want to keep things quick, easy and not too messy. I dislike cleaning nut milk bags (a lot) and don’t feel like washing my blender all the time so this quick shake and strain raw almond milk is perfect.

Ingredients:

  • 2 tbsp raw nut butter of choice
  • 2 tsp sunflower lecithin*
  • 1/4 tsp xanthum gum (optional)
  • pinch of cinnamon, vanilla, stevia, or other flavourings to taste
  • 4 cups of water (you might be able to use up to 5 cups, actually, but definitely 4)
  1. Put your ingredients into a container with a lid and shake away!
  2. Strain through a fine strainer.
  3. Enjoy! Keeps about 4 to 5 days.
  4. You can actually save the pulp and use it as the base for your next batch mixed with about a third to half of the proportions of listed above.

*The lecithin is very important. It’s an emulsifier and prevents the ingredients from separating in the liquid. It makes it creamy and a true milk. I prefer sunflower lecithin to soy which I’m intolerant to. The xanthum gum helps to thicken it up as well.

I’m enjoying this very much in my morning smoothies and I’m turning my husband on to it too. Go raw!

Quick & Easy Vegan Oat Milk in a Bodum

I’ve added Part II of this blog post, making quick and easy raw almond milk, here.

***

I’m leaving for a trip to Sweden next week to go to the Herrang Dance Camp where it will be difficult to eat the way that I like to. I’ve been planning to take a lot of food with me including a variety of my nut butters and my new favourite raw coconut wraps for lunch, power wraps and Larabars for snacks, and definitely vanilla Sun Warrior protein powder and chocolate Greensuperfood powder to make smoothies for breakfast.

Dilemma. What to do in place of almond milk in my breakfast smoothies? Mixing protein powder with plain water is just too thin. So I started to brainstorm ideas for a really quick, easy and portable vegan milk option to go.

I also like making raw almond milk this way, but the oat milk (which isn’t raw) is definitely more portable.

As for making homemade milks, almond or other, I hate using nut milk bags. They’re messy and a big hassle. It’s always tough to wash out the granules around the bag seam, and I just dislike the whole process. So recently I thought, why not use a coffee bodum instead?

Raw Vegan Oat Milk

  • 1/4 cup of oats*, ground in the food processor
  • 1/2 tbsp vegan lecithin granules as an emulsifier, preferably sunflower, otherwise soy
  • 1 tsp arrowroot powder
  • 1/2 tsp xanthum gum
  • pinch of stevia (I only NOW brand, most of the others are gross)
  • dash of vanilla bean powder (or vanilla extract), to taste
  • pinch of cinnamon, to taste
  • pinch of Himalayan salt
  • 2 cups of water

If you don’t have a bodum, you could use some sort of a smoothie shaker instead. I find these very practical for mixing up my Sun Warrior smoothies in the mornings.

Ingredients listed are for a single batch which you can shake or mix up as is… but if you’d like to be more organized about it, I’ve multiplied this recipe by 16 to make a big batch of the powder to take with me on my travels.
*I’ve used quick oats here for convenience, but use rolled oats if you have the time and organizational skills to soak your milk overnight before drinking it the next day.
If you can’t easily obtain one or some of the ingredients, you can still make a version of the milk, but after much experimenting I found that the inclusion of the lecithin, xanthum gum and arrowroot powder really made a big impact on the resulting creaminess. In fact, I just did a taste test on my picky hubby and he picked the oat milk over almond milk!

Dump the ingredients into the food processor. Then blitz it to make a powder.

Fill your bodum with 1/2 cup or so of the powder. If you don’t have a bodum, you could stir or shake this up and then pour it through a strainer of some kind, or just drink it with the “pulp”.

Add water, about 2 cups, and stir vigorously. Then use the bodum strainer to *slowly* strain your milk from the pulp. Don’t try to go too quickly as the strainer may get a bit plugged.

My bird, Gaudi, loves the oat milk!

Advantages to Oat Milk:

  • Cheap! Even with the xanthum gum and lecithin, homemade oat milk is a million times cheaper than store bought OR homemade almond milk.
  • No wasteful packaging. Nuff said.
  • Low calorie. Though Almond Breeze is low in calories, homemade almond milk is not necessarily low calorie. The oat milk definitely is though; about 40 calories per cup which is on par with Almond Breeze.

Visiting Toronto’s Raw Restaurants

On Thursday I tasked myself with the job of dropping off Rawstock Niagara postcards and posters to Toronto’s raw restaurants. Well if this is work, I’m sure that everybody would want the job! Eating and drinking my way across the city, I made a fun and delicious little adventure out of it and I look forward to repeating the pilgrimage again soon.

Starting in the East End, my day began at Belmonte Raw. This is the newest of Toronto’s raw vegan restaurants. I picked the perfect blisteringly hot day to kick things off with a mint watermelon juice which I enjoyed while chatting with the staff about our plans for Rawstock this summer. I had also intended to grab something green like a nice kale salad to get things rolling for the day, but once I saw the beautiful little chocolate thimbles, all I could think of was our friend Marlie Centawer’s of Barefoot and Frolicking’s blog post about Belmonte Raw and what she said about their chocolate. “Without a doubt, this was the most sumptuous, whipped raw cacoa experience I have ever had,” wrote Marlie, and she’s absolutely right. I’m not sure how she replicates that milk chocolate creaminess but it’s superb. Thursday’s option was only partially raw since the flavour was peanut butter with chocolate, but it was worth every bit of the indulgence.

Next I zipped over to St. Lawrence Market on the streetcar for a visit to Cruda Cafe.
If you haven’t been to Cruda, it’s conveniently located downstairs just past a great organic produce vendor and near a little seating area. This is a great go-to spot for “fast food” style raw.

I like that Cruda is advertising a 30-Day Raw Challenge because I’m planning to do 30 days completely high raw in August myself in honour of Rawstock.

The people at Cruda were really nice and I picked up a bag of raw enchilada wraps to take home with me. I’ve really been enjoying these with my two savoury raw nut butters the past few days. They’re really yummy with Curry Cashew butter and Moroccan Almond butter and great when you’re in a hurry. I would definitely pick these up again.

Ok, hop back on the subway and head North for stop #3 – Live Organic Food Bar! Oh Live, how do I love thee… I’m quite a dessert hog when it comes to raw vegan treats but with Live there are just so many delicious savoury creations to choose from. I remember when
I first tried their raw ravioli – it really blew my mind. But this time I was in the mood to relive some of the sushi bliss that I experienced at the Toronto Raw Vegan Festival a few weeks ago.  And Live didn’t disappoint in the least! The sushi was A-MAZING. So full of flavour with a fantastic texture and I loved the sauce and fresh pickled ginger. Yowza, that was yummy! After gobbling down this delectable appetizer, I had a little meeting with Jennifer who is so lovely. She expressed some interest in swing dancing so maybe I’ll get her out on the dance floor sometime.

No rest for the raw-loving wicked! Back on the subway and heading West to Bloor St. West for the larger of Rawlicious‘ two Toronto locations. Rawlicious is very close to my heart. It was at their original junction location that I experienced my first completely raw meal, shared with my father, and it was really life changing! Since then, I’ve been to their Yorkville location dozens of times and I’ve enjoyed this new location a couple of times too.

Quite recently opened – in the late fall I think? – the biggest of all the restaurants in the GTA.  The new spot is contemporary with airy high ceilings and tons of space. They even have live music on Friday and Saturday nights.

By this point I was getting pretty full, and overheated from all of my traveling around the city. I had a nice to chat with the staff picked up a refreshing Lean Green fresh juice to take for a little stroll along Bloor before getting back on the subway to hit the last of my stops, Rawlicious Yorkville.

Rawlicious Yorkville, my home away from home. My Toronto dance studio is right across the street so I visit these guys pretty often. The restaurant is small but stylish with a great vibe, the staff is friendly and welcoming, and the menu offers the perfect selection of beverages, appetizers, snacks, meals or desserts.

That said, I’ve been trying to eat out less often so I hadn’t been since they kicked off the summer menu. And what does that summer menu have on it but the mind blowingly delicious strawberry tart that I enjoyed so much last summer! Well, I was just so full and it was getting to be near time for my evening dance classes so I made the executive decision to get one strawberry tart to go as a treat for after my dance classes. Here’s a photo of the tart wrapped to go, and also a photo of the original tart that I remember so very well from last summer.

Many Rawstock Niagara postcards were dropped off, adventures were had, raw foods were sampled. It was a perfect adventure. So who’s in with me next time?

Raw Vegan Banana Coconut Cream Pie

Busy weekend coming up! Last weekend was the Frankie Tribute Weekend in Toronto which was a huge success but kicked my butt. I’m the primary organizer for the event and it was the culmination of months of work. Exhausting but completely worth it.

I was feeling under the weather last week and unfortunately had 7 days of laryngitis which carried right through the big weekend. I’ve also had some trouble with my eyes so I haven’t been able to wear my contact lenses lately. Time for another juice feast!

No rest for the wicked! Tomorrow is Niagara VegFest which will be a big weekend for my Health Nut products, followed by the Toronto Raw Vegan Festival next weekend which is even bigger! I’ve got 400 cheese (yes 400!) aging in a special fridge and about two dozen cases of nut butter ready to go. We’re also making some raw vegan cheese skewers with grapes for people to try.

Busy busy. But I can’t neglect this Sunday’s Conscious Eating Niagara potluck! Doug McNish will be coming along and very thoughtfully my friend Karen just gave me a copy of his new cookbook, Eat Raw, Eat Well, so I can have it signed.

Somehow I managed to have a bit of free time today to make my potluck item. I decided to whip something up using ingredients I already had at home. The result is an absolutely delicious Banana Coconut Cream Pie. I love my plain Coconut Cream Pie recipe too, but this is a nice alternative. The real vanilla bean really brings out the vanilla flavour. Delicious!

Banana Coconut Cream Pie

Ingredients
  • 6 cups coconut flakes, unsweetened
  • 1/2 cup coconut oil
  • 4 ripe bananas
  • 1/4 tsp real vanilla bean powder – the best part, artificial vanilla wouldn’t be the same in this recipe
  • 1 tiny scoop of NOW stevia, about 1/8 of a tsp (***WARNING: some stevia is gross, this is the only brand I’ve tried that I would recommend)
  • teensy pinch of pink Himalayan salt
Directions
  1. Blend the coconut flakes and coconut oil in the food processor to make coconut butter. Scrape the sides frequently and be patient. It takes a while6 cups of dried, unsweetened coconut flakes
  2. Add the bananas and blend some more.
  3. Add the rest of the ingredients and adjust to taste.
  4. Pour the filling into your crust of choice and set in the freezer for at least an hour to set.

For my crust this time around, I used pecans, dates and because I was low on dates a few prunes too. I also through in some cinnamon ’cause I felt like it. You can read more about raw vegan pie crusts here.

Chachi & Mandi Gould

Point & Curl with Chachi at the 2012 Frankie Tribute Weekend.

Raw Vanilla Bean Ice Cream with Chaga!

Chemotherapeutic Ice Cream? 

For the May Conscious Eating Niagara potluck I’m bringing ice cream made in my shnazzy new machine. I had planned to make something chocolaty, maybe with caramel or cherries again, but when I started to make the base and added in the pure vanilla bean powder it was too delicious so I left well enough alone.

The secret ingredient? Instead of using plain water for this recipe, I decided to give it superfood properties and used the tonic made with Chaga mushroom powder instead! Don’t worry, Chaga does not give off even a hint of mushroom. It has an earthy tea-like quality too it that’s very subtle and it worked perfectly with the vanilla bean. And now this ice cream has chemotherapeutic properties. How cool is that?

If you’re not familiar with chaga, it’s a fabulous superfood. Here is what my friend Lee at Truly Organic Food has to say about chaga:
“The chaga mushroom is well known for its full spectrum of immune stimulating phytochemicals. It is also high in betulin or betulinic acid which is a chemotherapeutic agent, which is why the pharmaceutical industry is interested in it and is currently doing many tests on it’s constituents. Chaga is best consumed in it’s natural stated as a tea tonic, that has had time to brew over 20 hours.”<

I made this ice cream in a much larger quantity for the potluck, but here would be the recipe for a basic recipe:

  • 1/4 cup raisins, soaked in water until plump
  • 2 cup chaga tonic liquid (or purified water)
  • 2 cups raw cashews, soaked for about 4 hours
  • 1 cup raw agave (coconut syrup or maple syrup would also be nice)
  • 1/4 tsp pure vanilla bean
  • pinch of Himalayan salt
  1. Blend your soaked cashews first with only some of the liquid to ensure that the mixture is smooth. Then add the rest of the ingredients.
  2. Refrigerate for at least 4 hours so that the mixture is cold before using your ice cream maker. I recommend over night.
  3. Follow the manufacturer’s directions for your ice cream machine and enjoy!

Raw Vegan Ice Cream

My request for my birthday was an ice cream maker so that I can start to make raw vegan ice cream. I was never a big ice cream person because the heavy dairy never sat well with me, but since trying the coconut and cashew based ice creams, I’m now an ice cream convert!

I wanted to get one of the ice cream makers that uses ice and salt so that I can use it even when our freezer is really full. Also, when my father was given the Cuisinart ice cream maker that you frequently see in stores, it didn’t work well for sugar-free ice creams at all. Because it used the method where the entire bowl goes in the freezer, it just didn’t get cold enough to really solidify the ice cream so it stayed soupy.

After some research, I decided that the Hamilton Beach model would give me the most bang for the buck. Since I’m not planning to make ice cream all the time, I wanted to pick a reasonably priced machine and I settled on this one.

It took me a while to get the rock salt that’s required for the machine. I realized after requesting a salt-working machine that I didn’t know what type of salt I would need! I did a lot of research on it and it was frustrating. Ultimately, I just bought some of the salt that people would put on the sidewalk in the winter but found one that didn’t have additional chemicals in it.

Finally organized to get the ice cream party started, I asked my husband what flavour he wanted me to make first. He kept saying strawberry, which I’m not particularly keen to make straight away, so I persuaded him to choose from one of the following Vice Cream recipes that also appealed to my own taste buds.

My main picks were:

  • Black Forest
  • Pecan Pie
  • Maple Walnut
  • Maple Pecan
  • Chocolate
  • Cherry Garcia

He picked Black Forest which works for me! I didn’t have a chance to pick up frozen cherries so I ended up soaking some dried cherries in advance instead. So here’s my version of the Vice Cream recipe:

Raw Vegan Black Forest Ice cream:

  • 1/2 cup dried cherries, soaked in water until plump
  • 2 cup purified water
  • 2 cups raw cashews, soaked for about 4 hours
  • 1 cup coconut syrup (agave or maple syrup would also work)
  • 1/2 cup cocoa
  • pinch of Himalayan salt
Method:
  1. Blend your soaked cashews and water in the blender or food processor to make a smooth milk. Add the cocoa, salt and coconut syrup and blend until silky smooth.
  2. Place the mixture in the freezer for 40 minutes to 1 hour or in fridge over night. (I went with over night.)
  3. Pour mixture into your ice cream maker and follow the manufacturers instructions. Once ready, remove the cover and blade from the ice cream maker and fold in the cherries, distributing evenly. Serve immediately or transfer to containers and store in freezer till ready to use.

I think it came out really well! I might have been able to get the cashews just a tiny bit smoother if I had blended it for longer but it’s definitely tasty. The cherries are the best part. I like ice cream that has *stuff* in it. I’m looking forward to feeding some to my hubby later on when he gets home.

Raw Vegan Notella Brownie Cheesecake

Last night was our April Potluck for Conscious Eating Niagara. At the last potluck I took some requests and my friend Fabienne voted for something with chocolate so voila!

The base was a chocolate hazelnut brownie, then a chocolate coconut filling and Notella by Health Nut for the icing. It was a winner! Sugar free, gluten free, chocolaty goodness.

Brownie Base:

  • 3 cups of hazelnuts (aprox.)
  • 3 cups of dates (aprox.)
  • 3/4 cup of cocoa (aprox.)
  • 1 tbsp coconut oil (optional)
  1. Yes, these are all approximations. It might have been more hazelnuts and fewer dates. You just start by blitzing the hazelnuts in the food processor.
  2. Once it makes a fine “flour” add about half of the cocoa and then start adding the dates until it comes together into a kind of dough. If it’s too dry and isn’t coming together, add a tablespoon of coconut oil.
  3. Once this is blending up nicely into a dough, add the rest of the cocoa to taste.
  4. Voila! Press into a lightly greased spring form pan. I recommend sprinkling coconut flakes on the bottom of the greased pan before you press in the dough. It helps to prevent sticking later.
Cheesecake Layer
  • 200g dehydrated coconut flakes (unsweetened)
  • 2 tbsp coconut oil
  • 800 mL of coconut milk
  • 1/2 cup coconut syrup or agave
  • 1/2 cup cocoa
  • 6 probiotic capsules (optional)
  • squirt of lemon (optional)
  • pinch of Himalayan salt (optional)
  1. If you want this to be more like real cream cheese, start by adding your probiotics to your coconut milk to soak in a bowl while you start the rest of the recipe.
  2. Blitz your coconut flakes and coconut oil in the food processor until it makes a creamy coconut butter. This takes a while.
  3. Add your coconut milk and blend. Add some lemon juice to the mix if you’d like.
  4. Once this is smooth, add your cocoa and then start to add your sweetener and taste to get the right amount of sweetness to your taste. Add a pinch of salt if you like.
  5. Pour over the brownie base and set in the fridge for at least 1 to 2 hours.
  6. Ice the cake with raw vegan Notella by Health Nut et voila!


Cheesecake